Speech Recognition with Android TensorFlow Machine Learning
Runs a simple speech recognition model built by the audio training tutorial. Listens for a small set of words, and highlights them in the UI when they are recognized.
The example application displays a list view with all of the known audio labels,
and highlights each one when it thinks it has detected one through the
microphone.
About TensorFlow Machine Learning Library
https://androidcontrol.blogspot.com/2017/03/machine-learning-tensorflow-android-app.html
What is TensorFlow?
TensorFlow is open source machine learning library from Google. Computation code is written in C++, but programmers can write their TensorFlow software in either C++ or Python and implemented for CPUs ,GPUs or both.
In November 2015, Google announced and open sourced TensorFlow, its latest and greatest machine learning library. This is a big deal for three reasons:
1.Machine Learning expertise: Google is a dominant force in machine learning. Its prominence in search owes a lot to the strides it achieved in machine learning.
2.Scalable : the announcement noted that TensorFlow was initially designed for internal use and that it’s already in production for some live product features.
3.Ability to run on Mobile.
This last reason is the operating reason for this post since we’ll be focusing on Android. If you examine the tensorflow repo on GitHub, you’ll find a little tensorflow/examples/android directory. I’ll try to shed some light on the Android TensorFlow example and some of the things going on under the hood.
Original code
https://github.com/tensorflow/tensorflow/tree/master/tensorflow/examples/android
Download Android App on Google Play


Reference
TensorFlow Android Demo Code
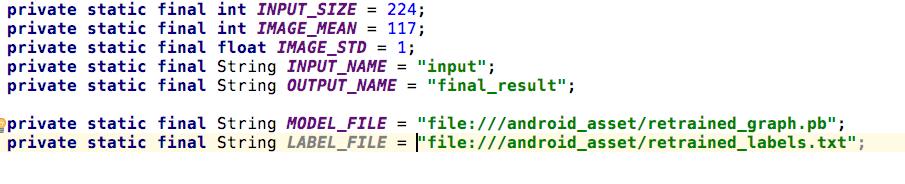
https://androidcontrol.blogspot.com/2017/09/android-flower-images-classifier-tensorflow.html
What is TensorFlow?
TensorFlow is open source machine learning library from Google. Computation code is written in C++, but programmers can write their TensorFlow software in either C++ or Python and implemented for CPUs ,GPUs or both.
In November 2015, Google announced and open sourced TensorFlow, its latest and greatest machine learning library. This is a big deal for three reasons:
1.Machine Learning expertise: Google is a dominant force in machine learning. Its prominence in search owes a lot to the strides it achieved in machine learning.
2.Scalable : the announcement noted that TensorFlow was initially designed for internal use and that it’s already in production for some live product features.
3.Ability to run on Mobile.
This last reason is the operating reason for this post since we’ll be focusing on Android. If you examine the tensorflow repo on GitHub, you’ll find a little tensorflow/examples/android directory. I’ll try to shed some light on the Android TensorFlow example and some of the things going on under the hood.
Original code
https://github.com/tensorflow/tensorflow/tree/master/tensorflow/examples/android
Download Android App on Google Play
more Machine Learning TensorFlow Android App.
Reference
TensorFlow Android Demo Code
https://androidcontrol.blogspot.com/2017/09/android-flower-images-classifier-tensorflow.html
My Website
email : info@softpowergroup.net ,amphancm@gmail.com
Tel .+6681-6452400 ( Thailand )
Tel .+6681-6452400 ( Thailand )